Definition

The Time page in Beeye is an essential tool that allows resources to accurately log the time spent on their tasks. By comparing actual time with planned time, teams can better understand productivity gaps and adjust their processes accordingly.
Additionally, this feature helps with the transition to billing by ensuring that worked hours are properly accounted for and ready for invoicing, which improves transparency, forecast accuracy, and overall resource management efficiency.
Why use the Time page?
If you're not already using Beeye's Time page, here's why it might be helpful for you:
- Alignment of planning and actual time: The timesheet allows you to check that planned tasks are completed as expected, providing a more accurate and reliable view of ongoing projects.
- Improving project accuracy: By combining planning with time tracking, users can better evaluate the gaps between estimated and actual time, improving the accuracy of future planning.
- Performance analysis: The timesheet provides concrete data to analyze team productivity and identify areas for improvement.
- Billing and profitability: For companies billing by the hour, precise tracking of time spent on each task simplifies invoicing and helps better understand project profitability.
- Reports and tracking: Timesheets can generate detailed reports used to justify costs, assess project performance, or manage human resources. In particular, you will be able to track unexpected or unbilled work with more precision.
- Compliance and transparency: Time tracking can help ensure compliance with work-time regulations and offers full transparency over the activities performed.
Who can use the Time page?

Permissions for accessing the Time page and the actions allowed on it are governed by three permissions that you can set in Settings > Roles:
- View timesheets: This permission controls who can read time information (access the Time page, view columns related to logged time, etc.).
- Edit timesheets: This permission controls who can edit time information (access resources' timesheets and modify them, log time in the timesheet).
- Approve timesheets: This permission controls who can approve timesheets submitted by resources.
To use the Time page, you must be assigned to a Role that has the permission to View timesheets with the option Myself (or more); otherwise, the page will not be displayed.
How to use the Time page
The Time page is made up of several sections:

Action bar: This allows you to perform key actions on the page, such as submitting a timesheet, adding time, or approving a timesheet (if you have the necessary permission).
View bar: This controls the page display and allows you to search through the page content.
Entry interface: This consists of a table that displays logged time for tasks belonging to different projects and allows time to be entered for each day of the week.

In the validation pages, you will find a list of timesheets that the user has access to.
Action Bar

Submit timesheet
The Submit button changes the status of the timesheet to Submitted, meaning that it is ready to be approved during a review phase. This action can be undone by clicking Reopen (see below); however, if the timesheet has already been approved, it cannot be reopened.
Reopen timesheet
This action is only available for a submitted timesheet that has not yet been approved by a reviewer. Reopening the timesheet allows modifications, corrections, or comments to be added before submitting it again. If the timesheet has already been approved, it cannot be reopened.
Add time
The Add time action allows you to log time in the open timesheet. To add time, you will need to choose the project, the task, and the number of hours you want to log. Optionally, you can add a comment. If the project or task has already been added during the week, you can simply search for the task using the search bar and log hours in the appropriate day's cell.
Importing from the schedule
The Import action saves time by importing the planned time into the timesheet. If you had planned to work on a task this week, the task and planned time will appear in the timesheet, and all you need to do is click to validate (or modify) these times. You can import all the planned time by clicking the Import planning button, which will import all planned times up to the current day.Approving a timesheet
If you have the permission to Approve timesheets, you will see the Approve button, which allows you to approve the logged time. Approving locks the timesheet, meaning it is now considered validated. In time exports, you will more easily be able to separate validated time from unvalidated time.Rejecting a timesheet
If you have the permission to Approve timesheets, you will see the Reject button, which allows you to reject a timesheet. This action returns the timesheet to the resource who submitted it, allowing them to make corrections before resubmitting it for approval.Sending a reminder
If you have the permission to Approve timesheets, you will see the Send reminder button, which allows you to send a reminder email to the relevant resources, especially for one or more unsent timesheets.View Bar

Search
You can use the search bar to quickly find a task or project for which you have previously logged time. To do this, just start typing the name of the task, project, or client in the search bar, and the table will immediately be filtered to show only the matching lines.
Select a resource

If you have the permission View or Edit timesheets > Team or Company, you will see a button allowing you to select a resource to view their timesheet. This lets you quickly make corrections if needed before approving the timesheet and sending it for billing. Without this permission, the selector will not appear.
Select a period
You can select the week you want to view by clicking on the date selector. If you have overdue timesheets, a visual indicator will quickly highlight this: a red dot will indicate the presence of overdue timesheets.Time Entry Table


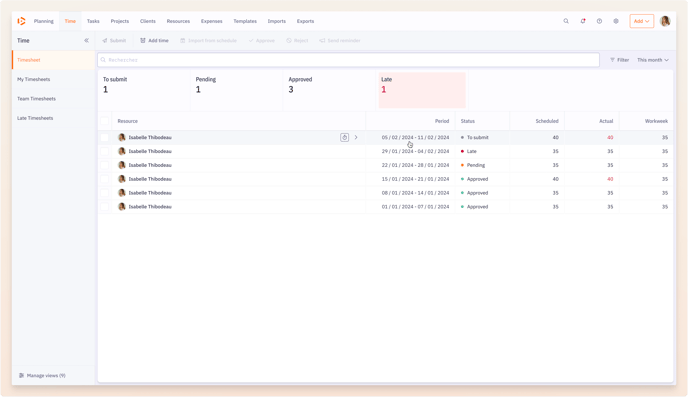
Above the table, there are indicators that give you a quick summary of the timesheet's content:
- Status: This represents the current status of the timesheet being viewed and can take the following values:
- To submit: The timesheet has not yet been submitted but must be submitted this week.
- Pending: The timesheet has been submitted but not yet approved.
- Approved: The timesheet has been approved.
- Late: The timesheet has not yet been submitted and should have been at least last week.
- Logged time: This represents the total hours logged during the displayed week.
- Workweek: This represents the number of hours worked according to the workweek parameters for the resource concerned.
- Time bank (optional): If the option is enabled, you will also see the time bank, which represents the total hours logged beyond the number defined by the workweek.
Logging time for a task

To log time for a task, simply click on the cell corresponding to the task and desired day, then log the number of hours worked. If a grayed-out number appears in the cell, it’s the number of hours you had planned to work on this task for that day, based on the available planning information. Clicking on the cell will convert the suggested hours into actual hours, and you can adjust if needed.
Opening/closing the list of projects

Pinning a project

Adding/reading a comment

When logging time, a field will appear allowing you to add a comment to your time entry. You can use this field to provide additional explanations that might be useful during the approval phase or for billing.
When a comment has been added, you can spot it by the orange indicator in the top-right corner of the cell. Click the cell again to read the comment.
Comments are also visible in time exports.
Editing a client, project, task
Clicking on the name of a client, project, or task opens the corresponding panel on the right.
If you have the necessary permissions, this shortcut allows you to edit these items directly from the timesheet.
Changing a task's status
Clicking on the task's status, if you have the necessary permissions, takes you to the status modification panel.
This shortcut lets you quickly change a task's status to allow time logging on it.
Timesheet List
The list of timesheets, accessible from the Approval page in the left menu, allows you to perform bulk actions by selecting multiple timesheets. Coupled with Beeye’s view system, it is particularly useful for validation tasks. For example, you can easily create views corresponding to each team to manage time validation efficiently.
Viewing timesheet details

When hovering over the timesheet list, you will see a clock button that allows you to access the details of the hovered timesheet.
Viewing a quick summary of the timesheet
Clicking on a timesheet line displays a summary table with all logged time and comments.
Logging negative Time
Yes, it is possible to enter negative time in Beeye, but this depends on the access rights assigned to the user.
The access setting for negative time entry allows the company to permit or restrict users from entering values below zero (for example, to correct a mistakenly recorded time).
